
Table of Contents
ToggleWobbly chairs. Scratched decks. Rusted metal caps that crumble when touched. Patio furniture takes a beating from sun, rain, and constant use, and the feet are often the first casualties. But replacing worn-out or missing furniture feet is one of the easiest, cheapest ways to extend the life of outdoor sets worth hundreds, or thousands, of dollars. Most homeowners can swap out feet in under an hour with basic tools and parts that cost less than a pizza. This guide walks through identifying the right replacement feet, measuring correctly, and installing them so furniture sits level and stable without damaging decks or patios.
Key Takeaways
- Replacing patio furniture feet is an affordable DIY solution that costs $10–$40 per set and takes under an hour, extending the life of furniture worth hundreds or thousands of dollars.
- Choose the right replacement feet type based on your surface and use case: glides for smooth decks and tile, durable rubber caps for rough concrete or stone, and adjustable leveling feet for uneven surfaces like flagstone patios.
- Accurate measurement is essential to avoid ordering the wrong size—use calipers to determine outside diameter for round tubing (common sizes: 7/8″, 1″, 1-1/4″, 1-1/2″) and measure both sides for square or rectangular tubing.
- Proper installation involves removing old feet with a rubber mallet, cleaning the leg ends thoroughly, test-fitting new feet, and leveling furniture to prevent wobbling and damage to decks or patios.
- Routine maintenance—including seasonal inspections, regular cleaning, and periodic adjustments for leveling feet—extends the life of replacement feet from 1–2 years for felt glides to 3–5 years for PTFE glides and up to a decade for adjustable metal feet.
Why Replace Patio Furniture Feet?
Furniture feet do more than just touch the ground. They distribute weight, prevent scratching or staining on surfaces, and keep chairs and tables from rocking. Over time, UV exposure makes plastic brittle, moisture corrodes metal, and friction wears down glides until they’re just nubs.
Worn feet cause real damage. Metal frames scrape composite decking, leaving grooves that collect dirt and water. Uneven chairs stress joints and fasteners, leading to cracked welds or loose bolts. Concrete patios can even chip when sharp exposed tubing grinds against the surface during every shift or pull.
Replacement also solves functional problems. Missing or damaged feet throw furniture off-level, making drinks tip and tables wobble. Adjustable leveling feet can compensate for uneven surfaces like sloped patios or flagstone, something original fixed-height feet can’t do. And new feet improve mobility: quality glides slide smoothly across wood or tile without the jarring scrape of bare metal.
Finally, there’s the cost argument. A mid-range dining set runs $600–$1,200. Replacement feet cost $10–$40 for a full set of four to six. Spending an hour on this simple swap beats hauling furniture to the curb and shopping for replacements.
Types of Replacement Feet for Patio Furniture
Not all replacement feet are interchangeable. Choosing the right type depends on the furniture’s base material, the patio surface, and whether the furniture needs to stay put or move frequently.
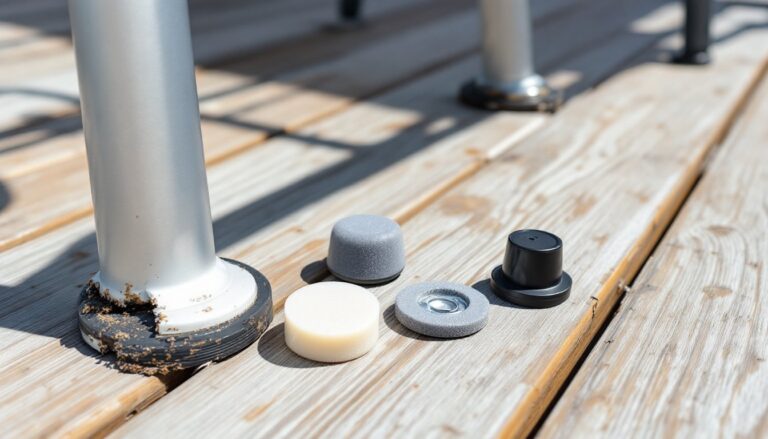
Glides vs. Caps
Glides are designed for smooth surfaces like wood decks, tile, or concrete. They feature a low-friction pad, usually felt, PTFE (Teflon), or molded nylon, that slides easily without scratching. Nail-on or screw-on glides work for wood furniture legs, while insert-style glides press or thread into hollow metal tubing. Felt glides are quiet and gentle on finished surfaces but wear out faster in wet conditions. PTFE glides last longer and resist moisture, making them better for year-round outdoor use.
Caps (or ferrules) enclose the leg end entirely and sit stationary. Rubber caps provide grip and cushioning, ideal for furniture on stone, brick, or rough concrete where sliding isn’t needed. Vinyl or polyethylene caps resist UV degradation and are common on aluminum and steel frames. Caps typically friction-fit over tubing or slip inside hollow legs, secured by internal ridges or a tight diameter match. They don’t slide well but protect both the leg and the surface from damage.
For mixed-use situations, like a dining set that sometimes moves across a deck, hybrid caps with soft bases offer a middle ground: the cap’s molded rubber base grips without marring the surface.
Adjustable Leveling Feet
Adjustable feet solve the headache of uneven ground. Each foot has a threaded stem or bolt that screws in or out, letting users fine-tune height leg by leg. They’re essential for flagstone patios, sloped decks, or any surface where shimming isn’t practical.
Most leveling feet use a plastic or rubber pad at the base to prevent slipping. The adjustment mechanism is either external (a thumb-screw or knurled nut) or internal (requiring a wrench). External adjusters are faster to dial in, but internal ones look cleaner and won’t snag on cleaning equipment or shoes.
Leveling feet add 1 to 2 inches of overall height to furniture, which matters if the set is already tall or if clearance under a table is tight. They’re also heavier and more expensive, $4–$10 per foot versus $1–$3 for basic caps, but the trade-off is worth it on challenging surfaces. Many woodworking and outdoor furniture projects benefit from adjustable feet to compensate for material expansion or settling over time.
How to Measure and Choose the Right Replacement Feet
Ordering the wrong size is the most common mistake. Patio furniture uses round, square, and oval tubing in a dizzying range of dimensions. Eyeballing won’t cut it.
For round tubing: Measure the outside diameter (OD) with calipers or a tape measure across the widest point. Common sizes are 7/8″, 1″, 1-1/4″, and 1-1/2″ OD. If the measurement falls between sizes, round up for insert-style feet (they compress slightly) or round down for caps (to avoid a loose fit).
For square or rectangular tubing: Measure each side. Standard profiles include 1″ × 1″, 1-1/4″ × 1-1/4″, and 3/4″ × 1-1/2″. The wall thickness (metal gauge) also matters for insert feet, thicker walls leave less internal clearance. Verify whether feet insert into the tubing or slip over the outside.
Wall thickness: For hollow legs, measure the inside diameter (ID) if using insert feet with expanding plugs or threaded stems. A dial caliper is the most accurate tool for this.
Next, check the existing foot type. Pull one off (they usually friction-fit or have a set screw) and note whether it inserts, caps over, or attaches with screws. Take the old foot to a hardware store if possible, it’s faster than measuring.
Finally, consider the surface and use case. Rough concrete or stone calls for durable rubber caps. Smooth composite decking needs soft glides or felt pads to avoid scratches. If the furniture moves often, prioritize glides over stationary caps. And if the ground is uneven, skip fixed-height feet entirely and go with adjustable leveling feet.
Pro tip: Order one extra foot as a spare. UV exposure and wear won’t hit all legs equally, and having a replacement on hand beats re-ordering and waiting for shipping.
Step-by-Step Guide to Replacing Patio Furniture Feet
Swapping furniture feet is straightforward, but doing it right ensures a secure fit and prevents damage during removal.
Tools and materials:
- Replacement feet (matched to tubing size and type)
- Rubber mallet or dead-blow hammer
- Penetrating oil (for stuck feet)
- Screwdriver or hex key (if feet are screw-attached)
- Wire brush or fine-grit sandpaper
- Work gloves and safety glasses
- Towel or cardboard (to protect furniture finish)
Step 1: Remove the old feet
Turn the furniture upside down or tip it on its side. If feet are friction-fit, tap them off with a rubber mallet from the inside of the leg. Stuck feet may need penetrating oil, spray the seam, wait 10 minutes, then wiggle and tap. For screw-on glides, remove fasteners and lift off. Avoid prying with screwdrivers, which can dent or scratch tubing.
Step 2: Clean the leg ends
Use a wire brush or sandpaper to remove rust, old adhesive, dirt, or oxidation from the tubing. This ensures the new feet seat properly and won’t pop off. Wipe with a damp cloth and let dry completely.
Step 3: Test-fit the new feet
Before final installation, slide or press each foot onto its leg by hand. The fit should be snug but not require extreme force. If a foot is too tight, lightly sand the tubing. If it’s loose, check the size, undersized feet won’t stay put and need to be exchanged. Many home repair and maintenance guides recommend test-fitting to avoid installation headaches.
Step 4: Install the replacement feet
For insert-style feet, align the foot with the leg opening and tap with a rubber mallet until it’s flush with the tube end. Some insert feet have expanding plugs or set screws, tighten these after seating the foot.
For cap-style feet, slide the cap over the leg end until it bottoms out. If the cap has internal ribs, twist slightly while pushing to help it seat.
For screw-on glides, position the glide and drive screws straight to avoid splitting wood or cross-threading.
For adjustable leveling feet, thread the stem into the insert or mounting bracket, leaving adjustment room. Don’t fully tighten until after leveling.
Step 5: Level the furniture
Flip the furniture upright and place it on the patio. Rock it gently to check for wobbles. With adjustable feet, turn each foot’s adjuster until the piece sits stable. Use a small level on the tabletop or seat to confirm. Lock adjusters with jam nuts or set screws if provided.
Step 6: Inspect and secure
Walk around and visually check that all feet are seated evenly and make full contact with the ground. Tug on each leg to ensure feet won’t pull off during normal use. If any foot feels loose, remove it, apply a thin bead of outdoor-rated adhesive (like polyurethane construction adhesive), and reinstall.
Safety note: Wear work gloves when handling metal furniture, cut edges and burrs are common. Safety glasses protect against debris when tapping or brushing rust.
Maintaining Your Replacement Feet for Longevity
New feet won’t last if ignored. A little routine care keeps them functional and prevents repeat replacements.
Seasonal inspections: Check feet at the start and end of the outdoor season. Look for cracks in plastic, worn glide pads, rust on metal components, or loose fits. Catching small issues early, like a single worn glide, prevents uneven wear on other feet and damage to surfaces.
Cleaning: Dirt, sand, and organic debris grind away at glides and caps. Rinse feet with a hose during regular furniture cleaning. For stubborn grime, scrub with a soft brush and mild soap. Avoid power washers at close range, they can dislodge insert feet or split caps.
Surface-specific care: On wood decks, felt glides trap moisture and can promote mildew. Lift furniture occasionally to let both the deck and glides dry. On concrete, inspect rubber caps for cracking from UV exposure and replace before they crumble. Many outdoor living and patio design resources emphasize regular furniture care as part of maintaining a cohesive garden space.
Adjustment check: If using leveling feet, re-check level monthly. Ground settling, wood expansion, or freeze-thaw cycles can shift furniture. A quick adjustment prevents stress on joints and fasteners.
Off-season storage: Store furniture indoors or cover it during winter. If leaving it outside, elevate legs on pavers or boards to keep feet off wet ground and reduce freeze damage to rubber or plastic components.
Replacement schedule: Even quality feet wear out. Felt glides may need replacement every 1–2 years with heavy use. PTFE glides and rubber caps typically last 3–5 years. Adjustable feet with metal threads can last a decade if kept clean and lubricated.
By treating replacement feet as routine maintenance, not a one-time fix, homeowners protect both their furniture investment and the surfaces underneath.